 03 Islamabad Shah Faisal Mosque |
 14 Team Photo At Thongol - Jerome Ryan, guide Iqbal, cook Ali, porters Syed, Muhammad Khan, and Muhammad Siddiq, sirdar Ali Naqi |
 03 Climbing Zig Zag Steps Cut Out Of A Rock Blocking The Trail From Askole To Korophon With Choricho |
 27 Muztagh Tower From Baltoro Glacier On Trek From Goro II to Concordia |
 35 Broad Peak Central And Main Summits From Baltoro Glacier Between Goro II and Concordia |
 11 Gasherbrum IV With Gasherbrum II Behind From Concordia |
 08 K2 Close Up From Concordia Afternoon |
 01 Concordia Campsite below Mitre Peak |
 17 Gasherbrum I and Gasherbrum I South Close Up |
 09 Paiju Peak From Khoburtse At Sunrise |
 13 Uli Biaho Tower Close Up From Khoburtse Just After Sunrise |
 21 Porter Hayder Khan At Khoburtse Just After Sunrise |
 18 Jerome Ryan Poses Above Lake On Baltoro Glacier With Great Trango Tower And Trango Castle Behind |
 13 Trango Monk And Trango Nameless Tower Close Up From Baltoro Glacier Between Paiju And Khoburtse |
 04 K2 Pokes Out To The Right Of The Cathedral Just Before Sunset From Paiju |
 26 Sunrise Over The Baltoro Glacier And Braldu River From Just Before Paiju |
 08 Skardu Khardong Hill And Kharpocho Fort Reflected In The Indus River |
 20 Sand Dunes Near Skardu |
 10 Nanga Parbat Rakhiot Face, Rakhiot Peak, Silver Saddle, East Peak, Silver Plateau, Summit, North Peaks On Flight From Islamabad To Skardu |
 08 Road Though Braldu Gorge To Askole Slants Dangerously Towards The Roaring Braldu River |
 20 Lobsang Spire From Khoburtse Just After Sunrise |
 16 Trango Castle From Khoburtse Early Morning |
 13 Masherbrum Close Up In Late Afternoon Sun From Goro II |
 15 Masherbrum Close Up At Sunrise From Goro II |
 17 Yermanendu Kangri, Masherbrum, Mandu Peak Just After Sunrise From Goro II |
 33 Gasherbrum IV And Gasherbrum II Close Up From Baltoro Glacier Between Goro II and Concordia |
 18 K2 Close Up At Sunset From Concordia |
 19 Gasherbrum IV At Sunrise From Concordia |
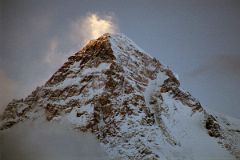
 24 Sunrise On K2 Summit From Concordia |
 25 K2 Just After Sunrise From Concordia |
 32 Broad Peak North Summit, Central Summit And Main Summit Early Morning From Near Concordia |
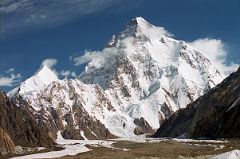 33 K2 Full View With Angel Angelus Peak From Near Concordia In The Morning |
 06 Gasherbrum IV Summit Close Up From Upper Baltoro Glacier On Trek To Shagring Camp |
 11 Green Glacial Lake On Upper Baltoro Glacier With Mitre Peak Behind |
 12 Shagring Camp On The Upper Baltoro Glacier With Baltoro Kangri |
 13 Chogolisa Late Afternoon From Shagring Camp On Upper Baltoro Glacier |
 15 Chogolisa I And Long Ridge To Chogolisa II Close Up Late Afternoon From Shagring Camp On Upper Baltoro Glacier |
 14 Gasherbrum IV Summit Peaks Out Of Clouds At Sunset From Goro II |